
Basic Game Tutorial 1: Drawing the Background
Hello! We meet again. In this part of the Game Tutorial, we'll be drawing a background image on screen. To achieve this, we'll be using a couple of techniques which are vital to learn for creating your own games.
By completing this tutorial, you will have learned a solid foundation to start creating your own games. Once you've got your head around this, you should try to do the same with different FUZE4 Nintendo Switch assets!
Creating the Image File
Let's get straight into this. In order to draw a background image on screen, we'll need a background image! Open a new project file and enter the single line of code below:
1. background = loadImage( "Kenney/backgrounds", false )There we have it! We have created a variable called background which stores the image file we want. We've used the loadImage() function to do this, which has two arguments. The first is the location and name of the image file in speech marks. The second is a true or false switch for a filter. We will not be using a filter on our graphics, so this is set to false.
Now we've done this, we can freely use the variable called background in our program if we want to use the background image.
Setting up Camera Variables
In platform games, we usually have a background image and level which is larger than the screen. As we move our character along the level, the screen moves with us, scrolling the background and level to the left.
Take a look at the image below to help picture this in your mind:
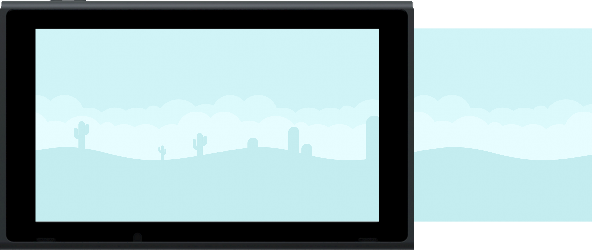
As you can see, we have a background image which is larger than the console screen.
If we were to move our camera (the screen) along, the background image would appear to be moving to the left:
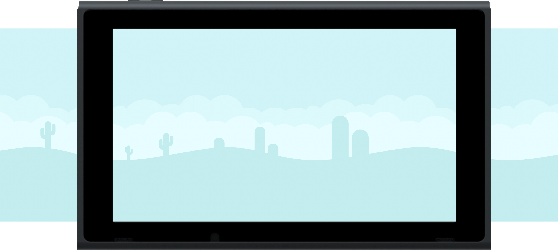
In fact, our background image is not moving, but our camera (screen) is!
Let's take a look at the first picture again, but with some coordinates. Imagine we want to draw the background image using x and y coordinates. We know the top left hand corner of the screen is 0 on the x axis, and 0 on the y axis. So our coordinates for drawing the background on screen would be (0, 0):
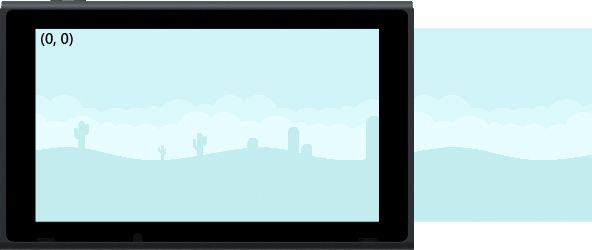
All good?
Let's say we move the camera (screen) 200 pixels to the right. To make our background image move in the opposite direction by the same amount, we must now draw it at (-200, 0):
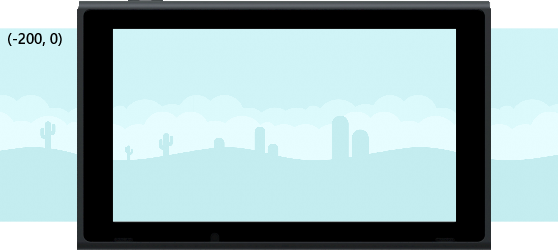
If we want this to change while the program is running, we must use variables to store the camera position.
With that explained, we can add two variables to our program. Make the following changes to your code:
  1. background = loadImage( "Kenney/backgrounds", false )
  2.
  3. screenX = 0
  4. screenY = 0
There we go! We will use these variables when it's time to draw the background on screen.
Main Game Loop
Let's start our main game loop.
As we know, all games must use a loop which clears and updates the screen for us to see movement. Let's begin with that. Add the following lines to your program:
  1. background = loadImage( "Kenney/backgrounds", false )
  2.
  3. screenX = 0
  4. screenY = 0
  5.
  6. loop
  7.     clear()
  8.
  9.     update()
 10. repeat
Simple enough! Our loop doesn't do anything just yet, other than clearing and updating the screen, but this is where we must start when writing a visual program with animation.
Anything we want to happen during our game must now be added to the main loop.
Dynamic Scaling
Wow that's a tricky couple of words... What does it mean?
Well, your Nintendo Switch is very clever. When you put the console in the dock, it displays on whatever TV screen you might have it plugged into.
In the screen tutorial project, we mentioned that the console's screen is 1280 pixels on the x axis, and 720 on the y axis. We can access the width and height of the screen with the gwidth() and gheight() functions.
Those numbers might change when we put the console into the dock and display it on a TV screen.
Whilst we are making our game project, we want to be able to detect the width and height of screen while the game is running. This way, we can freely use the console in handheld or docked mode, and the game will automatically scale our graphics to look awesome no matter what!
To achieve this, we will create two variables inside the main game loop. Add the following changes to your code:
  1. background = loadImage( "Kenney/backgrounds", false )
  2.
  3. screenX = 0
  4. screenY = 0
  5.
  6. loop
  7.     clear()
  8.
  9.     screenW = gwidth()
 10.     screenH = gheight()
 11.
 12.     update()
 13. repeat
There we go!
No we have all the information we could ever need for our screen. We have a screen position in the screenX and screenY variables, and screen dimensions stored in the screenW and screenH variables!
All that's left is to draw the background image!
Drawing the Background Image
It might seem like an awful lot of setting up just to draw an image on screen, but doing things this way will mean we won't have to come back and make lots of changes later. This way, we can move forward and our brilliant program will take care of everything for us.
All we need now is one line of code to draw the background image. Add the following change to your code:
  1. background = loadImage( "Kenney/backgrounds", false )
  2.
  3. screenX = 0
  4. screenY = 0
  5.
  6. loop
  7.     clear()
  8.
  9.     screenW = gwidth()
 10.     screenH = gheight()
 11.
 12.     drawImage( background, -screenX, -screenY )
 11.
 12.     update()
 13. repeat
We use the drawImage() function to draw the image stored in the background variable to the x and y positions stored in screenX and screenY.
We use minus in front of the x and y positions so that our background moves to the left by the same amount that our screen moves to the right. Now we can freely move the screen any amount in any direction and our background will always move correctly!
Scaling the Background Image
Run the program to see the background image.
Ah... It appears we have a problem...
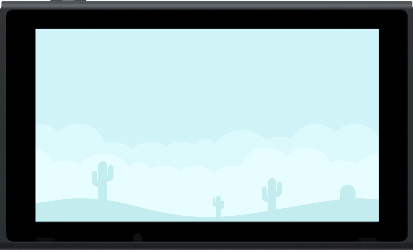
Right now, our background looks like this:
But it should look like this:
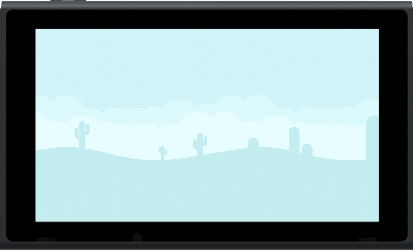
Our background image is quite tall. Much taller than our screen is. Because of this, we won't see our image properly. We must use a secret extra feature of the drawImage() function. It's an extra argument for the scale of the image.
We need to scale our image depending on the height of the screen.
If we divide the size of the screen by the height of the image, we will get our exact number to scale by.
We have a very clever function to find the size of an image, it's called imageSize()!
When we put an image in the brackets of the imageSize() function, we can access the width or height of that image with .x and .y.
With this in mind, let's make the last change to our drawImage() line:
  1. background = loadImage( "Kenney/backgrounds", false )
  2.
  3. screenX = 0
  4. screenY = 0
  5.
  6. loop
  7.     clear()
  8.
  9.     screenW = gwidth()
 10.     screenH = gheight()
 11.
 12.     drawImage( background, -screenX, -screenY, screenH / imageSize( background ).y )
 11.
 12.     update()
 13. repeat
Notice that our drawImage() line now has an extra argument for a total of three. The scale argument reads: screenH / imageSize(background).y. This takes the height of the screen stored in the screenH variable and divides it by the height of the background image. We then use this result as a scale to multiply the background image size, giving us a perfectly fitting image no matter what screen we are using! Neat!
End Result
Before we move on to the next part of our Game Tutorial project, let's double check that we have everything correct so far. Your program should look exactly like this:
  1. background = loadImage( "Kenney/backgrounds", false )
  2.
  3. screenX = 0
  4. screenY = 0
  5.
  6. loop
  7.    clear()
  8.
  9.    screenW = gwidth()
 10.    screenH = gheight()
 11.
 12.    drawImage( background, -screenX, -screenY, screenH / imageSize( background ).y )
 11.
 12.    update()
 13. repeat
When we run the program, we will just see the background image on screen in the correct dimensions. It should look something like this:

If this is how your screen looks too, awesome! We're ready to take the next step.
Functions and Keywords used in this tutorial
clear(), drawImage(), gHeight(), gWidth(), loadImage(), loop, repeat, update()